NuxtJS & SSR with GTM
This article is a guide on how to setup Google Tag Manager to track views with NuxtJS & SSR. We will be setting up basic view tracking for Google Analytics with a custom implementation, which can be fine tuned or adjusted based on your use case or view metrics.
Terminology
First, let me break down the basic terminology. NuxtJS is a Vue based opinionated SSR(Server-Side Rendering) framework inspired by NextJS which is React based. Google Tag Manager(GTM) is google's tool used to aggregate and link a lot of google services. In this guide, we will primarily use GTM to integrate with google analytics.
The Problem
I had to go ahead with a custom implementation since we tried to setup Google Tag Manger & faced as lot of issues. We tried a lot of packages from NPM that did not work for our use case.
Setting up using the default functionality was straightforward & it was tracking URL's correctly using a History Change trigger. The URL updated correctly on Google Analytics, but it was showing the title of the previous page. This could not be bypassed, since we were using SSR & GTag loads on the first load and then takes over completely.
The article is split into two sections -
Code
Create an app.html in your src folder. Add your Google Tag Manager snippets to this document along with any other third party scripts.
The app.html implementation is used since it is the earliest point in the code build process where you can inject a third party script. The functionality can be implemented without using app.html if there is any layout function that is already implemented where this snippet can be implemented.
<!DOCTYPE html>
<html {{ HTML_ATTRS }}>
  <head {{ HEAD_ATTRS }}>
    <!-- Google Tag Manager -->
    <script>
      const gTagInit = (window, document, script, layer, gtagId) => {
        window[layer] = window[layer] || []
        window[layer].push({
          'gtm.start': new Date().getTime(),
          'event': 'gtm.js'
        })
        const f = document.getElementsByTagName(script)[0]
        const j = document.createElement(script)
        const dl = layer !== 'dataLayer' ? '&l=' + layer : ''
        j.async = true
        j.src = 'https://www.googletagmanager.com/gtm.js?id=' + gtagId + dl
        f.parentNode.insertBefore(j, f)
      }

      gTagInit(window, document, 'script', 'dataLayer', 'GTM-ABCDEFG')
    </script>
    <!-- End Google Tag Manager -->
    {{ HEAD }}
  </head>

  <body {{ BODY_ATTRS }}>
    <!-- Google Tag Manager (noscript) -->
    <noscript
      ><iframe
        src="https://www.googletagmanager.com/ns.html?id=GTM-ABCDEFG"
        height="0"
        width="0"
        style="display:none;visibility:hidden"
      ></iframe
    ></noscript>
    <!-- End Google Tag Manager (noscript) -->
    {{ APP }}
  </body>
</html>
Add this snippet to where the title & path is accessible. In VueJS & NuxtJS, you could add this to the metaInfo property of your page/component. Additionally, this could be added to any middleware that is used by you to set page SEO.
window.dataLayer.push({
  event: 'VirtualPageview',
  virtualPageURL: route.path,
  virtualPageTitle: title
})
This is all of the implementation required in the codebase, we will now move on to the implementation on the Google Tag Manager Dashboard.
Google Tag Manager
Triggers
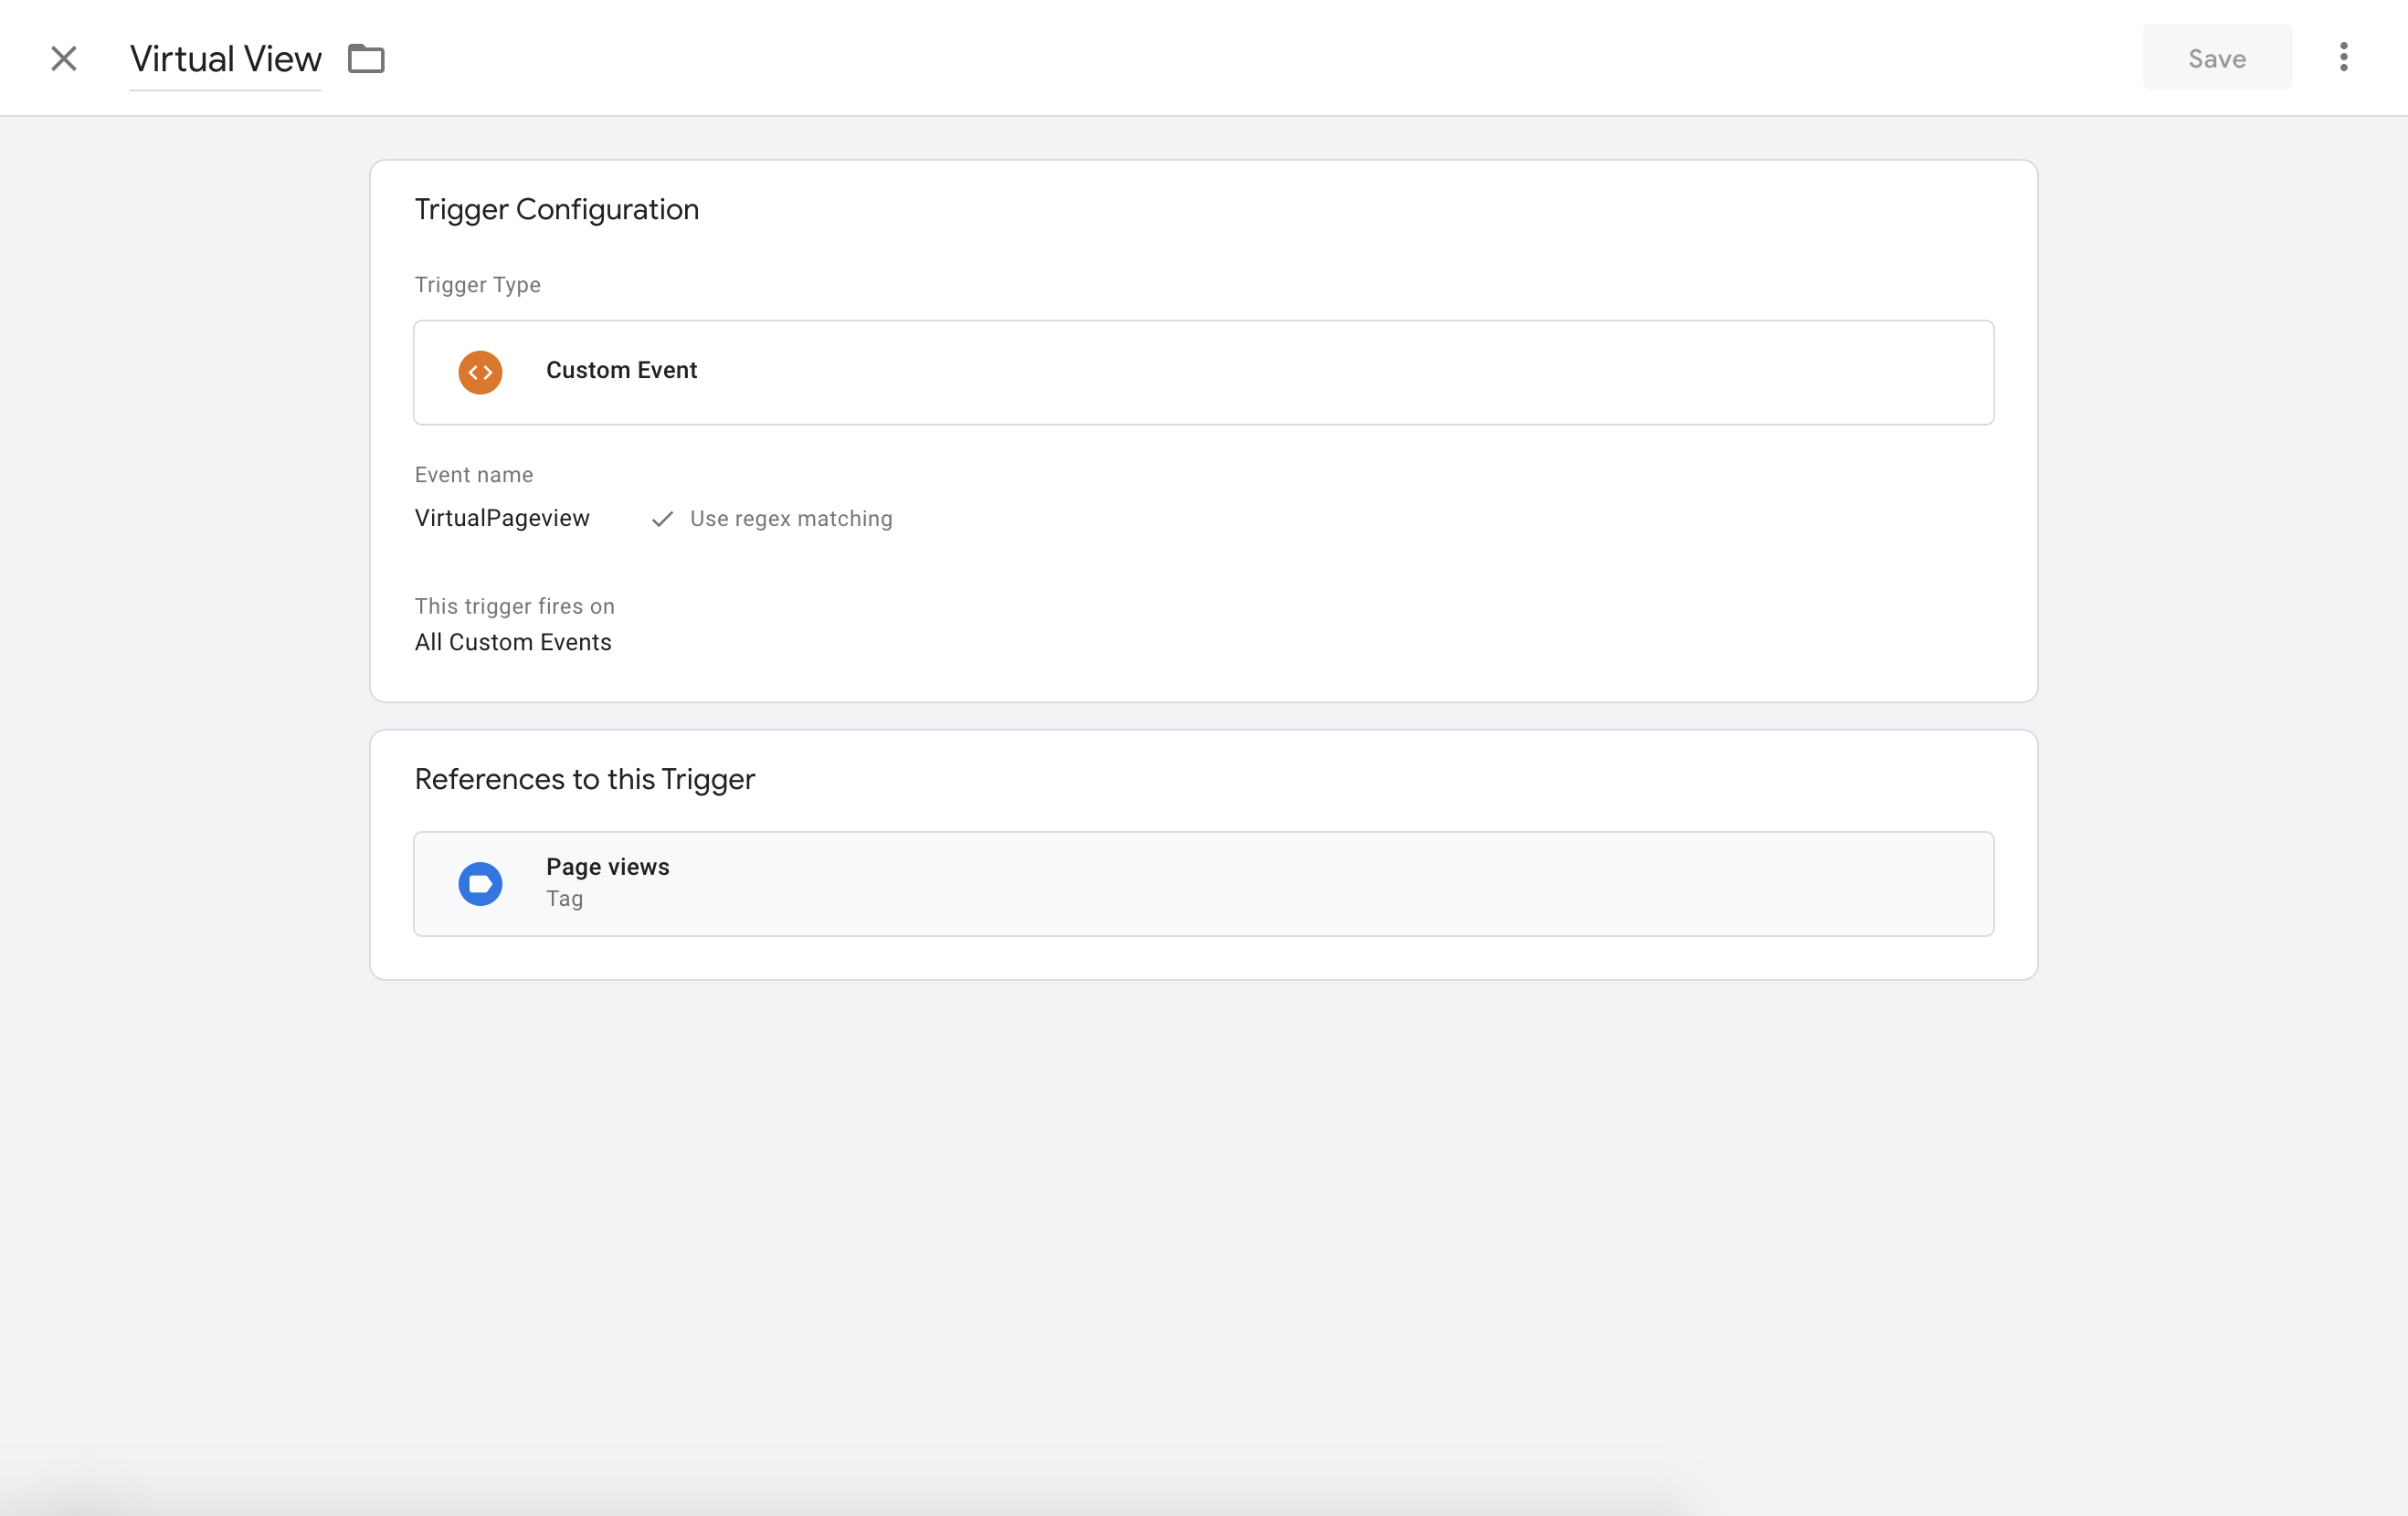
We will be using a custom event to override the default google analytics event to track views. I will be naming it 'Virtual View', but you can assign any name. The trigger type will be of Custom Event. The event name should be 'VirtualPageview'. Enable regex matching & the trigger should fire on 'All Custom Events'.
Variables
We will be creating 3 user defined variables -
- Virtual Title
- Virtual Name
- Google Analytics Tracking ID (Optional)
Virtual Title
This is the title we will be using to override the default analytics title. We are already pushing it as a parameter of virtualPageTitle on the VirtualPageview event. We can setup that assignment to be a variable that is accessible by Tag Manager. Create a new user defined variable. I am naming it 'Virtual Title' and this is the name that will be used to reference the variable. Choose the variable type as 'Data Layer Variable' and assign the Data Layer Variable Name as 'virtualPageTitle'.
Virtual URL
This variable is the same as the Virtual Title except that its name will be 'Virtual URL' and its underlying variable name will be 'virtualPageURL'.
Google Analytics Tracking ID
It is optional to assign this to a variable, since it will be assigned to every Google Analytics Tag implementation. Create a new variable with any name. I will name it 'Google Analytics Tracking ID'. The variable type will be Google Analytics Settings. Assign your Google Analytics Tracking ID in the tracking ID field & set the cookie domain to be auto.
Tag
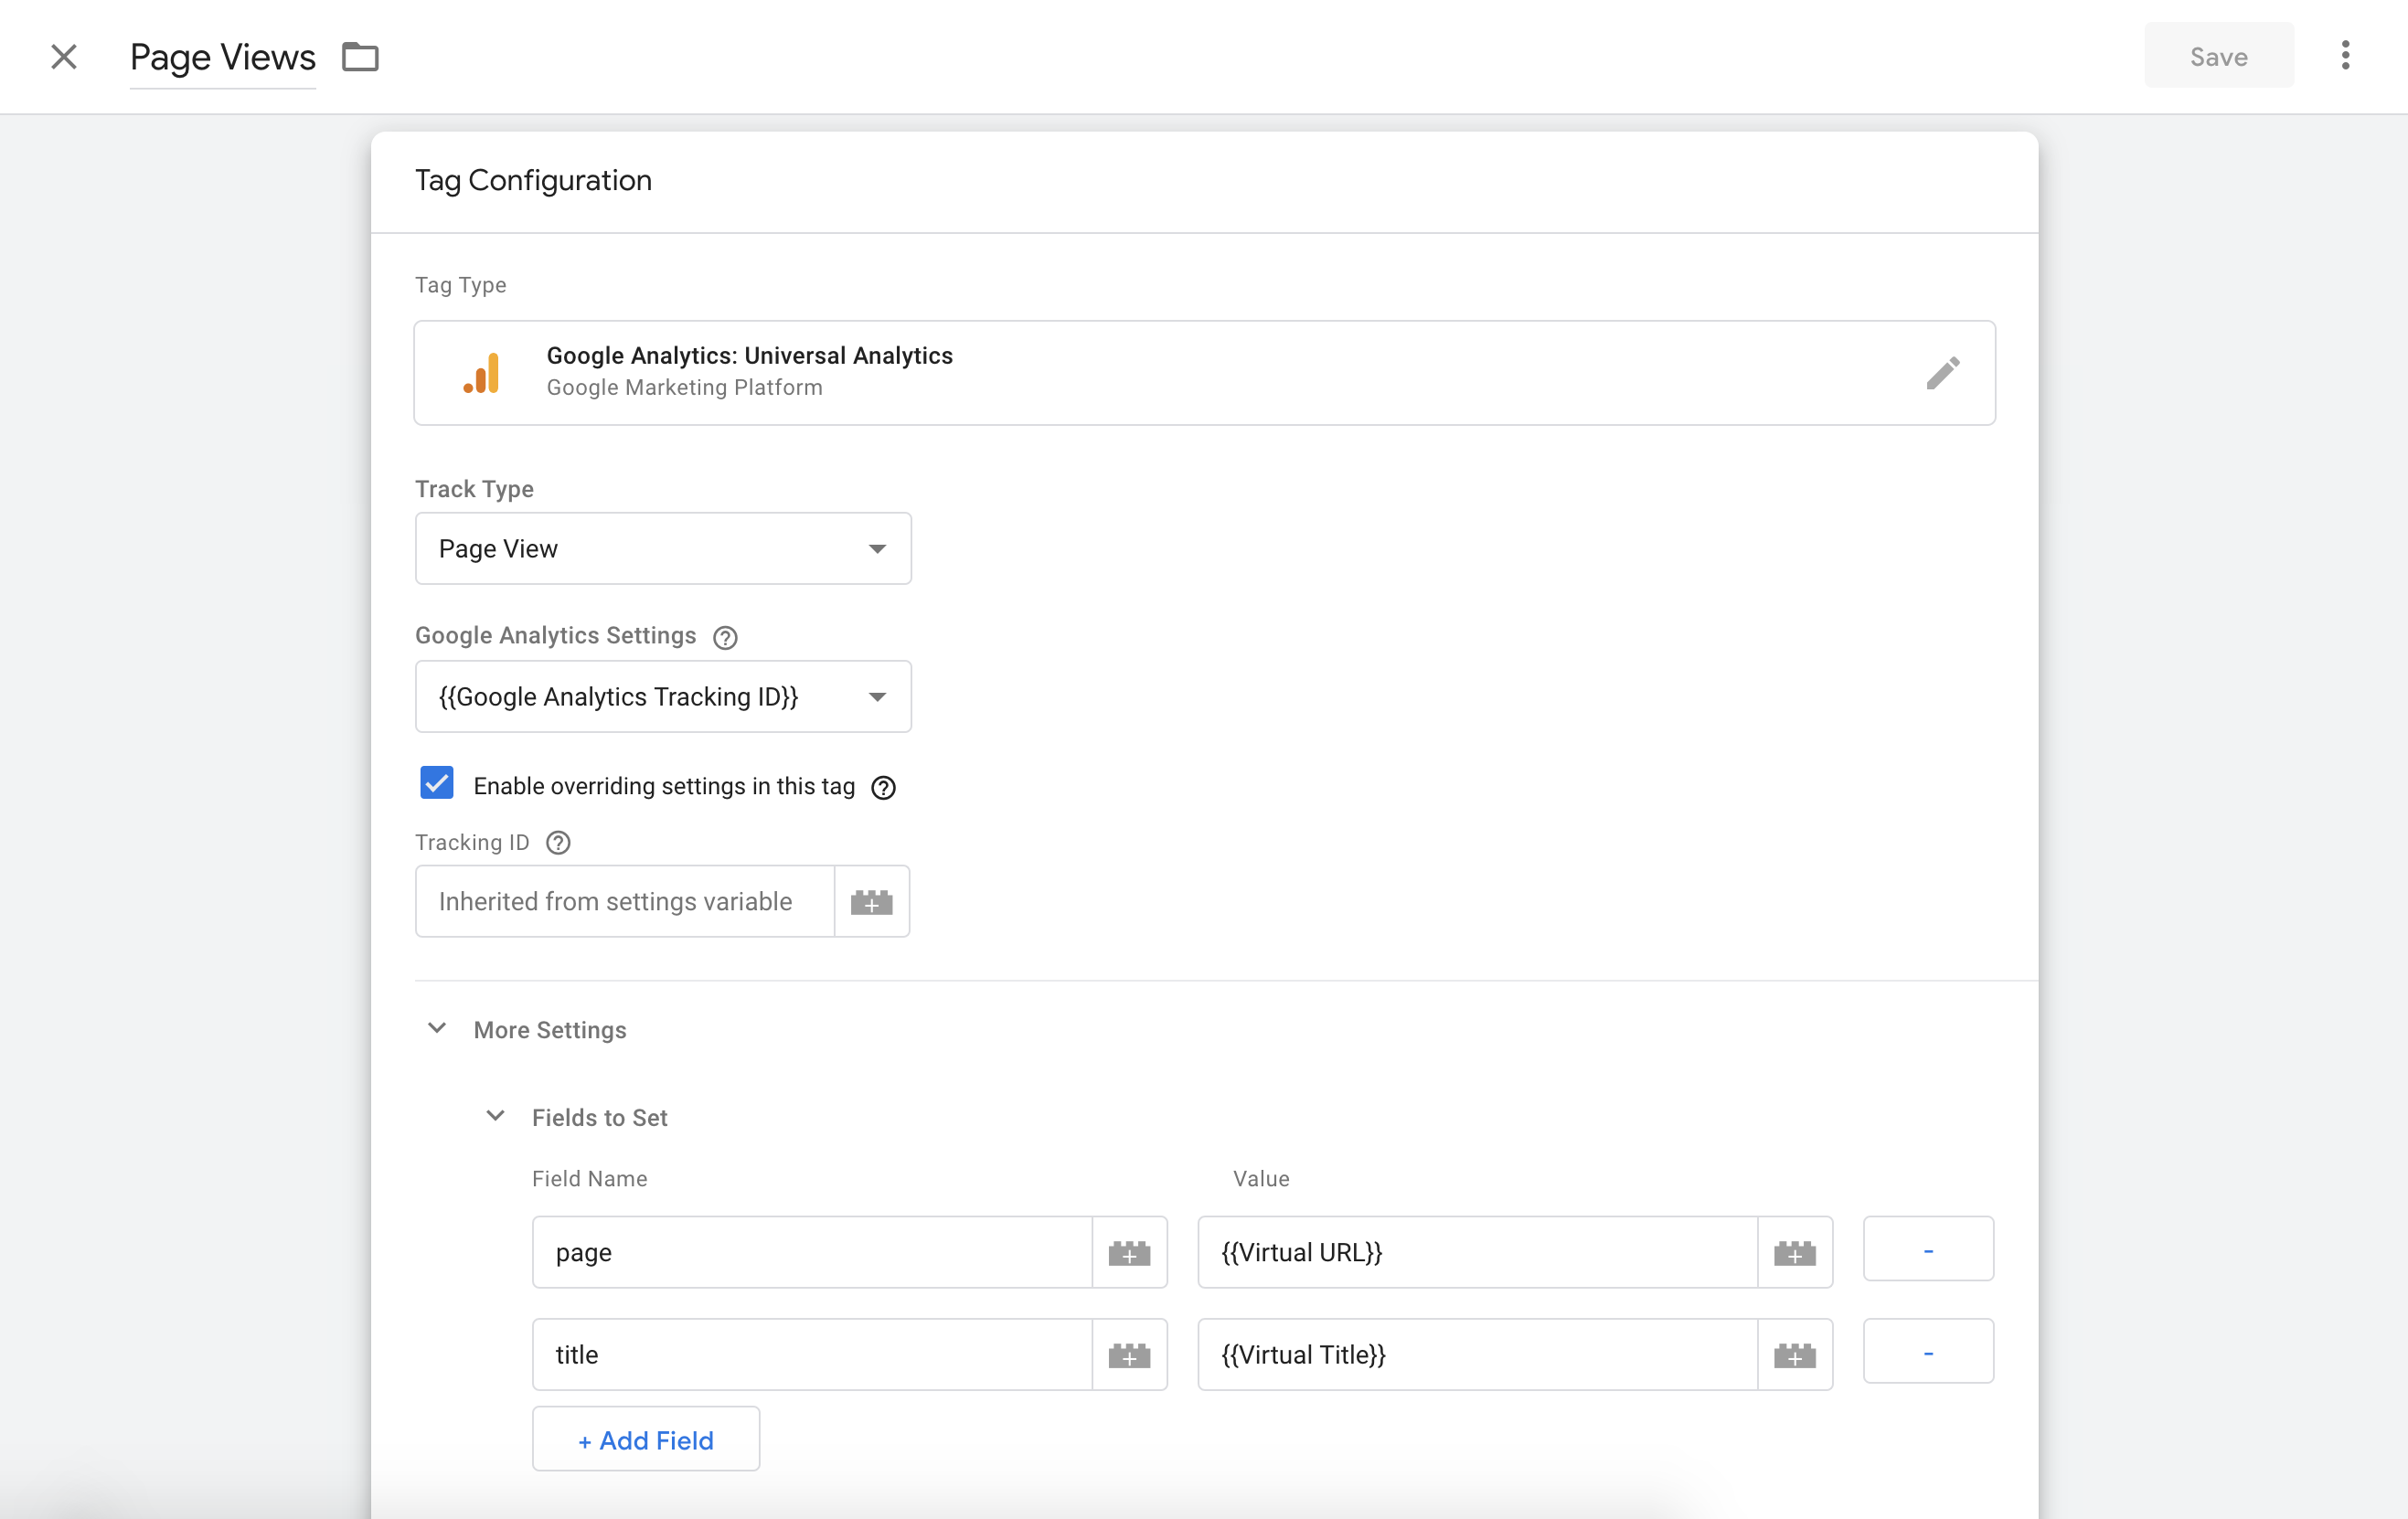
Create a new tag, I will name it 'Page views'.
The tag type will be Google Analytics: Universal Analytics. The track type will be Page View. In the Google Analytics Setting field you can assign your Google Analytics Tracking ID variable or just add your Google Analytics Tracking ID.
Expand the More Settings section & then the Fields To Set section. Set the field name and values as the following if you have used the same variable names as I have -
- page - {{Virtual URL}}
- title - {{Virtual Title}}
Then we will assign a trigger to this tag. Select the Virtual View Custom Event that we have created. You have successfully setup Google Analytics view tracking!
Preview Mode
The preview mode is a very powerful tool for testing & debugging. It can be accessed by clicking the preview button next to the submit button on the Google Tag Manager dashboard.
The tool is useful to debug if the events you are firing have the correct content, what the current dataLayer looks like & to see a list of every event that is fired with the dataLayer before and after the event was fired.
Going Forward
I hope this guide has been helpful. You can setup more custom and granular controls over how you wish to work with GTM & explore more advanced use cases. I am always open to help out if this solution doesn't work or if you have an interesting suggestion/question. Feel free to email hello@mustafazc.com or tweet/DM me on @mustafazc.